Last frost date is around May 15th, although new maps were issued this year and now they say last frost date is May 10th. Just to be safe I have some floating row cover I will use for a couple of weeks after I plant.
Now is the time to resist temptation. With all the warm weather I really want to get my plants in the ground but that would be a bad thing for two reasons - cold and sunshine. I already touched on the cold part. A frost could settle in and kill young plants. I lost several last year in just such a manner. But the other thing to worry about is sunshine. Setting out plants that have been started and growing under lights will cause a plant to die, just like frost. Think of it as a very bad case of sunburn.
You have to slowly acclimate your plants to the sun. This will take several days. First, you have to realize that all but the most brilliant and specialized lights are very dull compared to sunlight. Even shaded areas are brighter than your grow lights.
At my house my deck gets morning sun and afternoon shade. What I do is set the plants in the afternoon shade for about an hour, less if it's windy (the plants aren't used to wind either so you need to limit the time spent outdoors until they get stronger). I do the same thing for 3 straight days, increasing their time spent outdoors each time and always bringing the plants back indoors when done. Next, I set the plants in an area that gets mostly shade with maybe some morning sun. My deck works perfectly for this. The spindles in the railing partially shade the plants until the sun is shaded by the house. I leave them there all the time unless it's too cold at night or if the wind really kicks up. It's VERY important to watch their water and the condition of the leaves. You can't let them dry out. You may have to water them every day. Also, you'll be able to spot the signs of sunburn, the leaves will start to turn yellow and papery. Once this happens you can't save the leaves, but you may save the plant. Bring it back indoors and see what kind of growth you get if you get new leaves, set the plant outdoors. The new leaves will be adjusted to the brighter light conditions. If not, toss the plant and make a mental note for next year. Once the plants are acclimated, I keep them outdoors until planting time; unless it's going to get cold overnight or for a few days then they come back indoors.
I'll start this process for the tomatoes and peppers this weekend. The peppers can probably wait a week but with the floating row cover I am going to plant them right along with my tomatoes. Peppers like it a little warmer than tomatoes.
Monday, April 30, 2007
Thursday, April 26, 2007
Final rain tally
From Monday Night through Thursday afternoon I got 2.4 inches at my house. I also got .6 on Sunday so that is right at 3 inches in the last week. Places to the northwest and southeast all got a lot more than me, some as much a 6 inches in the last 3 days. There's quite a bit of localized flooding, but nothing major where I live.
Wednesday, April 25, 2007
Rain - Rain - Rain
And even more rain...In the last day and a half I have exactly 2 inches of rain...and it's still coming down..a good soaking was needed so I'm happy with it. The rain keeps me inside and that's not a lot of fun. The rain will help those seeds I just planted to germinate.
On Sunday I planted my onions. I usually start mine from seed but didn't do that this year. I bought some sets at Earl May and am planting them. I have 3 varieties; Walla Walla, Texas Sweet 1015, and Candy. I've grown them all before and have good luck with them...
On Sunday I planted my onions. I usually start mine from seed but didn't do that this year. I bought some sets at Earl May and am planting them. I have 3 varieties; Walla Walla, Texas Sweet 1015, and Candy. I've grown them all before and have good luck with them...
Friday, April 20, 2007
Seeds planted...
I always feel so much better once I get seeds in the ground.
Yesterday I finally planted some seeds...
Broccoli Raab - Spring. An heirloom variety from Burpee. This is my first time with broccoli raab.
Spinach - Harmony Hybrid. A variety from Burpee. I usually have good luck with spinach, but this is my first go with this particular variety. Early, upright plants and slow to bolt. Sounds good to me.
Swiss Chard - Rhubarb. The variety is named 'rhubarb' and it comes from Seed Savers Exchange. I think it's because the stalks are very red and the plants look like rhubarb. This is my first time growing it. Like spinach, I grow chard just about every year and do well with it.
Radish - French Breakfast. An heirloom from Burpee. Everybody has grown radishes at one point or another. I don't recall if I've grown these or not, but the package was not opened so I will guess I haven't.
Snap Peas - Sugar Snap. From Gurney's. I usually grow some peas every year. I can usually harvest for about a week, but that's okay. fresh from the garden ALWAYS beats from a can or frozen...ALWAYS!
Wednesday, April 18, 2007
Turning soil
Today I turned the soil on my garden beds. I didn't do this last fall so I had to clear up some plant debris. When you turn your soil in the fall the freezing and thawing break it down so that all you need to do is rake it and plant. That may be oversimplified but that's pretty darned close to the truth. Turning in the spring has no real negative problems other than the soil has had a few months to compact a bit. That's not a huge issue. My two garden beds are, 16 foot by 4 foot raised beds. You'll see pictures later. It takes me about 30-45 minutes to turn the both by hand with a garden fork. That's about the hardest physical work involved in the garden. I have built up the soil quality and height by adding organic matter, soil, sand; just about anything I can get my hands on. I have a large compost bin next to the beds and I get one good batch a year. I think I would get more if i spent some time and broke up the items before i put them in but I'm in no hurry. Since I wont be planting tomatoes or peppers for a good month or so i am not going to smooth one of the beds. I'll let nature do that. the other bed will get planted with spinach, chard, onions and other things in another day or so. I'll rake it then. Now is a dangerous time. The weather seems nice but our last frost date wont pass until May 15th or so. Last year we had a frost on the 13th. I had planted my tomatoes a few days before and left for vacation. I lost all but 3 plants. this year I will remember to cover them...
Tuesday, April 17, 2007
How To Start Tomato Seeds - part 5
Time to cull the herd
For some people this is very difficult. They can't bring themselves to eliminate one single plant. If you do this you'll end up with too many plants and TONS of tomatoes. That may be exactly what you want but I recommend having one plant per cell. The plants root better and aren't competing with each other for limited nutrients. Here is the flat before we thin the plants. Notice there are as many as 4 plants per cell.

Here is a close up of the young plants. As I stated in post 4 you should wait until you have true leaves before you do any of this. In this picture you can really see the difference between the true leaves and the cotyledons. Also notice that one of the plants is considerably larger than the other (it's just to the right). When deciding which plant to keep I almost always go for the larger more robust looking plant.
Here is the actual process. ALWAYS cut the unwanted plants out. DO NOT pull them. The roots are larger than you know and when you pull them you will probably damage the plant you want to keep. Get yourself some scissors or small shears and CAREFULLY select the plant you want to remove. If you check the picture below you see I am removing a plant. I cut only with the very tip of the scissors since I don't want to inadvertently take out a wanted plant. I've done this in the past and it is very frustrating.

Here are the results. The plants can now freely grow without any competition. They now have room to grow. One other cool thing is the smell of the cut plants - they smell just like tomato leaves (cause that's what they are!) - it just reminds me of whats to come this summer when I reach into one of these plants and pick a ripe fruit. I can't wait!

For the next few weeks it's all about making sure they don't dry out while also preventing them from being over watered. It's a fine line but after a while you can tell just by looking at them. Keeping the plants as close to the lights as possible will help them grow without getting too thin. We'll talk more about that in the future.
For some people this is very difficult. They can't bring themselves to eliminate one single plant. If you do this you'll end up with too many plants and TONS of tomatoes. That may be exactly what you want but I recommend having one plant per cell. The plants root better and aren't competing with each other for limited nutrients. Here is the flat before we thin the plants. Notice there are as many as 4 plants per cell.

Here is a close up of the young plants. As I stated in post 4 you should wait until you have true leaves before you do any of this. In this picture you can really see the difference between the true leaves and the cotyledons. Also notice that one of the plants is considerably larger than the other (it's just to the right). When deciding which plant to keep I almost always go for the larger more robust looking plant.

Here is the actual process. ALWAYS cut the unwanted plants out. DO NOT pull them. The roots are larger than you know and when you pull them you will probably damage the plant you want to keep. Get yourself some scissors or small shears and CAREFULLY select the plant you want to remove. If you check the picture below you see I am removing a plant. I cut only with the very tip of the scissors since I don't want to inadvertently take out a wanted plant. I've done this in the past and it is very frustrating.

Here are the results. The plants can now freely grow without any competition. They now have room to grow. One other cool thing is the smell of the cut plants - they smell just like tomato leaves (cause that's what they are!) - it just reminds me of whats to come this summer when I reach into one of these plants and pick a ripe fruit. I can't wait!

For the next few weeks it's all about making sure they don't dry out while also preventing them from being over watered. It's a fine line but after a while you can tell just by looking at them. Keeping the plants as close to the lights as possible will help them grow without getting too thin. We'll talk more about that in the future.
Thursday, April 12, 2007
How To Start Tomato Seeds - part 4

Seed progress: All the seeds have germinated and are about 1-2 inches tall. This is the easiest and hardest time when it comes to raising tomatoes. Easiest? Because if you have everything set up correctly you don't really have to do anything for a while. Just make sure they don't dry out and are getting the correct amount of light. My lights have are plugged into a timer that comes on at 5am and turns off at 10pm. That's 16 hours of light a day. They need a good 12 to 16 hours a day to gather the light needed to grow. They also need the 8 hours of dark to grow. It's during the dark that they actually grow. Gather the light during the day - turn it into growth during the night.
I know you are wondering why this would also be considered the hardest time as well? Simple - You have to resist the urge to do anything to the plants. That means no fertilizer, over watering, touching, moving, playing with and fawning over these little things. LEAVE THEM ALONE UNTIL THEY HAVE THEIR FIRST TRUE LEAVES. I'll show you what I mean:
 If you look at the leaves on these plants you'll notice the shapes. Two of them are long and plain, while others are small and have a strange shape with scallops and lobes...in short...they look like tomato leaves. The larger ones in the picture are not true leaves - they are cotyledons - it's part of the seed and give the plant the ability to photosynthesize light until the first true leaves are formed. They eventually shrivel up as the plant gets larger. My general rule of thumb is to do nothing but make sure the plants have water and light until the true leaves are larger than the cotyledons.
Thursday, April 5, 2007
Disc Golf Course pictures
Here are some pictures of the Disc Golf course in Windflower Park that I am helping install. I post these pictures so we can do a 'before and after' comparison. Click on the pictures to see larger versions. This is the first hole. The basket will be just past the big tree in the middle. 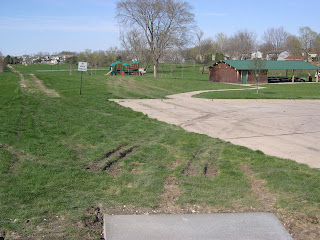
Here is the second hole. The basket will be placed past the tree in the middle. It is also tucked up close to the creek.

Here is the 3rd hole. The basket, again, will be on the other side of the large tree. The first 3 holes each have a tree between the tee and the basket. You'll have to decide how you get around them.

The fourth hole runs along the creek past the trees, then you shoot at a basket on the other side of the creek (to the right). You've got a lot of space to the left. This hole will be trickier when the wind kicks up, which is often. They don't call it Windflower Park for nothing.
 Five six and seven - Amen Corner? We'll have to see how they play. Below is five long. The basket will be among the trees at the top of the creek. You'll be able to wail off the tee but the second shot will be a bear...
 Here is 5 short. If you enlarge the photo you should see the white marker where the basket will be. It is tucked in among the trees and the photo gives you the impression the basket is closer than it is.

Six long. This requires a right-to-left shot off the tee. If you see the disc land it will be a bad shot.

Six short. When you enlarge the photo you can see the marker for the basket. You'll have the tree to deal with, then the basket which in nestled up tight to the pine trees.

Seven Long. The basket is on the other side of the pine trees in the middle. This will require an accurate tee shot. I think this is the longest hole on the course.
Seven short. You may be able to blast through the trees or come around the sides. Depends what happens off the tee.

Starting with the eighth hole you have several holes the require you deal with the creek. The good thing is, it's shallow and there is no poison ivy. The bad thing is if you go long it's a bogey. The basket on 8 is beyond the tall tree in the middle.

The ninth hole is pretty straight, again with the creek right next to the basket. I don't think the picture gives you the correct idea of the length,

Ten - one of the shorter holes. obviously you'll have to work your way around the tree. You'll want to avoid trowing into the backyard. They have dogs...

Eleven - more trees to deal with. The fenced off portion wont really come into play. You'll have to work your disc to the basket, which is beyond the trees a stretch. When they leaf out this hole will become quite difficult.

The twelfth hole...yep...you want to go straight between these trees and over the creek to the little white flag up by the parking lot. FUN!

There it is. Most all the holes have several ways to play them off the tee. You'll have to work your shots so the better your hyzer (or anhyzer) the better your score. The guys that designed the course really put a lot of thought into each shot. I think you will enjoy it.

Here is the second hole. The basket will be placed past the tree in the middle. It is also tucked up close to the creek.

Here is the 3rd hole. The basket, again, will be on the other side of the large tree. The first 3 holes each have a tree between the tee and the basket. You'll have to decide how you get around them.

The fourth hole runs along the creek past the trees, then you shoot at a basket on the other side of the creek (to the right). You've got a lot of space to the left. This hole will be trickier when the wind kicks up, which is often. They don't call it Windflower Park for nothing.
 Five six and seven - Amen Corner? We'll have to see how they play. Below is five long. The basket will be among the trees at the top of the creek. You'll be able to wail off the tee but the second shot will be a bear...
 Here is 5 short. If you enlarge the photo you should see the white marker where the basket will be. It is tucked in among the trees and the photo gives you the impression the basket is closer than it is.
Six long. This requires a right-to-left shot off the tee. If you see the disc land it will be a bad shot.

Six short. When you enlarge the photo you can see the marker for the basket. You'll have the tree to deal with, then the basket which in nestled up tight to the pine trees.

Seven Long. The basket is on the other side of the pine trees in the middle. This will require an accurate tee shot. I think this is the longest hole on the course.

Seven short. You may be able to blast through the trees or come around the sides. Depends what happens off the tee.

Starting with the eighth hole you have several holes the require you deal with the creek. The good thing is, it's shallow and there is no poison ivy. The bad thing is if you go long it's a bogey. The basket on 8 is beyond the tall tree in the middle.

The ninth hole is pretty straight, again with the creek right next to the basket. I don't think the picture gives you the correct idea of the length,

Ten - one of the shorter holes. obviously you'll have to work your way around the tree. You'll want to avoid trowing into the backyard. They have dogs...

Eleven - more trees to deal with. The fenced off portion wont really come into play. You'll have to work your disc to the basket, which is beyond the trees a stretch. When they leaf out this hole will become quite difficult.

The twelfth hole...yep...you want to go straight between these trees and over the creek to the little white flag up by the parking lot. FUN!

There it is. Most all the holes have several ways to play them off the tee. You'll have to work your shots so the better your hyzer (or anhyzer) the better your score. The guys that designed the course really put a lot of thought into each shot. I think you will enjoy it.
Wednesday, April 4, 2007

Tuesday, April 3, 2007
Disc Golf Course
 This is the first tee for a disc golf course i am helping to install in a local park. A couple of other guys have done all of the planning and layout, etc. I am helping with some labor. In the end I am happy to contribute to something that I think will make the park a little nicer and give people a reason to visit. Click on the Pictures to see larger versions...


Sunday, April 1, 2007
How To Start Tomato Seeds - part 4
Let's get down to it...
Here's what I am planting...

First thing - make your labels. It's much easier to do this now rather than after you plant the seeds. This way you can keep track of where you planted what. Trust me on this one...
 Next, place the seeds in the trays. I put 3 in each pod just to help me track germination and viability. I have skipped the part about placing the seed starting mix into the seed trays. The picture below shows some details. It can be hard to see the seeds. One more reason to place the markers in as you go. This year one variety has pelletized seeds. These seeds are coated in clay. It makes the seeds easier to handle as they are quite small. Here's a close up. Try to find the Roma's...The Grape's are obvious.
 Here is one tray completed.
 Next, each tray gets a very thorough watering. I suppose I fill it half-way. Since the soil-less mixture has plenty of peat it soaks up an awful lot of water. Next, I cover the tray with a clear dome. This is just to help keep the moisture in. After the seedlings emerge I will remove it. Each tray get placed on the center shelf of my light rack. This rack has heating cables and foil to raise the temperature and increase the light intensity. Once the seedling emerge I will unplug the heating cables. Now, cross you fingers and hope for the best!
Subscribe to:
Posts (Atom)
