Here it is - ice cold and snow covered and all the garden catalogs are starting to come in. I'm ready to start planting - but I'll have to plan first.
Sunday, December 28, 2008
Tuesday, June 24, 2008


Tomato progress
I haven't posted much about my tomatoes this year. They are doing great this year. We've had a ton of rain and that may have helped some. This year I planted several new and a few trusted varieties.
Here's what I went with this year:
Pineapple - had great success with them last year. Great flavor and BIG. Territorial Seed Co.
Beam's Yellow Pear - For my wife cause she loves them - Seed Savers Exchange
Brandywine (Sudduths's) - I haven't grown Brandywine's for a few years. I can't remember why cause they are great - SSE
Hillbilly Potato Loaf - New for me - Big - yellow red - right up my alley - SSE
Green Sausage - Green cylindrical shaped - Determinate - I haven't grown anything like them for a while - MTF - SSE
German Pink - Big, German, Pink - Describes me after I've been in the sun - SSE
Gold Medal - New for me - gold with red streaks - I sense a pattern - SSE
Federle - Big long paste tomatoes. New for me - SSE
Old German - Red and Gold streaked big meaty flesh - Territorial Seed Co.
Here is the first fruit of the year. It is the Green Sausage. Truthfully I pinched off a few fruits a couple of weeks ago or I may have had a couple of nearly ripe fruits in JUNE! This is one odd looking plant. It just sprawls all over the place. The leave are sparse and long with several clusters of fruit spread all over the plant. They seem to be resisting my efforts to stake them. I may let them win.

Here are all the tomatoes. They are in the north bed this year. I also made a better effort to put more space between them as I felt they were a little cramped last year. They are all 2 feet apart in all directions. So far so good.

This is the Hillbilly Potato Loaf. Nice healthy looking plant.

I believe this is a flower from the German Pink.

Monday, June 23, 2008
Hops Update
Well I did it...I killed some hops...I'm so ashamed...I think it was inconsistent watering...too little followed by too much...not to mention the rain mother nature blessed us with in the first half of June. So my Cascades and Magnum are gone. I'll be looking to replace them next spring.
Here is a hop cone, at least it will be. Right now it's a burr. This is a blooming flower from the hop plant. Plants used for cone production are all female. I don't know the technical parts of the flower but I'm pretty sure you can see almost all of them. This is a Kent Golding that came up along the east side of my deck. I thought I dug it all up but...

Here's the burr just starting to emerge. This is a Fuggles I transplanted.

Here is another burr from a Nuggett plant I moved this year.

Here is the Nuggett. the bottom of the eve is about 8 feet tall. I snipped the growing tip at that point. The bines on the left are up to about 10 feet. I snip the growing tips to encourage side shoots. These shoots are where the hop cones actually grow. This plant looks good this year.

The one on the left is the Fuggles. A windy thunderstorm did a number on it and snapped some of the bines at about 3 feet, I looks like the survivors are coming back and I expect them to do fine this year. The one in the middle is a transplanted Kent Golding. It's growing like crazy, about 14-15 feet tall. The one on the right is another Kent Golding. I planted it just to fill in a blank spot and it has taken off. I think next year it will be a winner. Look at the far left at the lattice under my deck...there are some 'volunteer' Fuggles. They really like that corner.

Thursday, May 15, 2008
Tomatoes & Peppers planted
Just a quick entry - I planted my tomatoes and peppers this evening. They were started using the same method as last year. I'm giving them a little more space this year. That's probably more for harvesting than anything else. I'll get some pictures up next week.
I'm heading out with some friends for a weekend of camping and disc golf, so there will be no hops update until early next week. They are doing fine and I am seeing the Fuggles, Goldings and Nugget going strong. The new ones are slowly coming along. Scroll down and see some pictures from last week. They look just like that, only bigger!
I'm heading out with some friends for a weekend of camping and disc golf, so there will be no hops update until early next week. They are doing fine and I am seeing the Fuggles, Goldings and Nugget going strong. The new ones are slowly coming along. Scroll down and see some pictures from last week. They look just like that, only bigger!
Saturday, May 10, 2008
Weekly Hop Update
Here it is a week later and there is a lot of growth to report. Overall, the plants I moved are all doing great, while the rhizomes I planted are all struggling. I'm not worried about them because I know they will pull through. You'll see what I mean later. The first picture shows the overall view of the hop yard. The Fuggles is at the bottom of the picture followed by Cascade, Goldings, Goldings, Cascade, Magnum, Nugget.

Here is the Fuggles. It's growing like crazy. I expect it will grow a good foot or so a week.

Next is the Goldings. I had to help the shoots get over to the trellis but once I did they took over from there.

The Return Of The Cascade! Last week the frost got the only growing shoot. I gently dug it up and found it was getting ready to push up another one, so I replanted it. Yesterday it popped through the soil. Now that it has a leaf out it will do just fine. Next is another Goldings. I had so many extra Rhizomes that I felt I should plant one more. This one sprouted in a week and is now doing fine.

Here is the Magnum. I really think the frost last week put a dent in this one. There was a third shoot that has died back. The small one on the left has stopped and the big one on the right has slowed to a crawl compared to the rest of the plants. A little warm weather should get this one going again.
Here is the Nuggett. It seems to be enjoying it's new home. I came home one evening and all the bines had started wrapping around the string. No help from me. It's already bigger around than it ever was in it's old spot. I've got another cascade that just seem to be taking it's own sweet time. I dug it up earlier in the week and there are shoots ready to pop up. We'll see if this is the week it decides to join the others.

Here is the Fuggles. It's growing like crazy. I expect it will grow a good foot or so a week.

Next is the Goldings. I had to help the shoots get over to the trellis but once I did they took over from there.

The Return Of The Cascade! Last week the frost got the only growing shoot. I gently dug it up and found it was getting ready to push up another one, so I replanted it. Yesterday it popped through the soil. Now that it has a leaf out it will do just fine.
 Next is another Goldings. I had so many extra Rhizomes that I felt I should plant one more. This one sprouted in a week and is now doing fine.
Here is the Magnum. I really think the frost last week put a dent in this one. There was a third shoot that has died back. The small one on the left has stopped and the big one on the right has slowed to a crawl compared to the rest of the plants. A little warm weather should get this one going again.

Here is the Nuggett. It seems to be enjoying it's new home. I came home one evening and all the bines had started wrapping around the string. No help from me. It's already bigger around than it ever was in it's old spot.
 I've got another cascade that just seem to be taking it's own sweet time. I dug it up earlier in the week and there are shoots ready to pop up. We'll see if this is the week it decides to join the others.
Container Garden
This year I'm going to grow more vegetables in containers. I've got 4 large pots with potatoes, 3 with a lettuce mix, and a couple others I haven't yet decided upon. This first picture shows what I've got going as of this morning. We had a rain shower so everything is green and wet. 
The next picture shows a mesclun mix. I probably planted a little too much here. I sprinkled the seeds along the top and set the pot out. It's a 12 inch self watering pot and I think it's working fine. The self watering part is a mesh piece that runs along the bottom of the pot. There is a large water reservoir built into the pot that the mesh runs into. The water reservoir holds at least a gallon and probably more. The mesh makes the water available to the pot without having it sit in water. As the water in the pot is used by the plants or evaporates, it is pulled through the mesh into the soil mixture. I noticed that the self watering pots had seedling up and growing well before the standard pot. In the picture above the standard pot is the square one. It was planted the same date as the two self watering pots just to the right of it.

Below are two of the four pots with potatoes. They were planted in late March and left outdoors. I've only watered once or twice as we have had a lot of rain this spring. The variety is La Ratte, an heirloom fingerling variety from Seed Savers Exchange. I'm also planting some in the garden just to compare

Monday, May 5, 2008
Garden Started
After the long cold spring I finally got around to planting some of the garden. I always feel better when that happens. Onions, shallots, spinach and carrots are planted. Tomatoes and peppers will be in the ground in a couple of weeks. More info to follow...
Saturday, May 3, 2008
More Hop Progress (plus they're hard to kill!)
Things have progressed and here it is a week later. We had a heavy frost and that caused a set back for one of the plants.
Here are the Fuggles. They've done well this week with no apparent damage from the frost. I am starting to wind them around the strings. Once they get started they will twist around the strings themselves.

Below are the Kent Goldings. They are coming up all over the place. I did some digging and it looks like they grew laterally before they broke the ground surface. I'll have to come up with something to get the growing towards the trellis.

This is the Nugget. Notice how the tips of the shoots are pointing towards the sun. I'll probably start winding them around the strings this week. They needs a few more inches of growth first.

Unfortunately the Cascade got taken out by the frost. You can see the wilted brown shoot between the bricks. I dug this one up and found a new shoot so I'm pretty sure it will come around.

The Magnum is coming along fine. I didn't get a good picture so I decided to skip it this week. I also have another Cascade that I'm not sure about. I dug around it and it looks like it might be sending something up this week.
Here's what I mean about hops being hard to kill...This picture is some of the Fuggles. I dug this plant on April 6th (see my previous blog post). This little shoot is growing about 6 feet from where the original plant was.

Below is some of the Kent Goldings. It's coming up all over underneath the deck, despit my efforts to pull it all up and move it. I'll let both of these grow and cover part of the deck.

Sunday, April 27, 2008
Four Days later
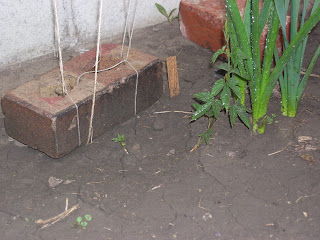
 Look at the picture below and see 4 days of growth. I moved the brick that anchors the trellis so the bines can start climbing.
Wednesday, April 23, 2008
Hop Progress
I snapped a few pictures this morning. It's amazing what heavy rain and sunshine can do!
 Here is the Fuggle. This was a very large crown that I replanted (see the previous post). Looks like it's off to a great start!
 Here's the Kent Goldings. This was a smaller rhizome, I'm expecting it to take of here with the warmer weather. At least I HOPE it does.
 Here's a new one for me, a Cascade. This is one I ordered from Norther Brewer and was distributed by Freshops. It was the size of a golf pencil when I planted.
 This is a Magnum from Northern Brewer/Freshops. I just planted it this year. It was a little bigger and nicer looking than the Cascade and I think you can tell by the early growth.
 This is a Nugget that I transplanted about a month ago. It was growing on the fence the last few years. It's never done real well for me, but I'm giving it a prime spot so I think/hope it will do better.
I also have another Cascade that I got in a trade. It was soaking wet when I got it so I'm not sure how it will do. It still hasn't come up yet but I'm not concerned at this point.
Sunday, April 6, 2008
Hops
I've grown hops for home brewing for a couple of years. Today I finished moving 2 of my plants to their new home. Here's how it happened...
Below is the first plant I moved. The variety is Fuggles used for ales. I moved this here 3 years ago. I have done very little to it. Pour some fertilizer on the crown each spring and thats about it. It's grown very well and produced very well until a wind storm came along and stripped most of the cones off it.

This is the second plant I moved. East Kent Goldings. More about that below.

Here is a rhizome. These grow off to the side form the main crown. If you picture the main crown off to the right, you can see how the plant expands. These are right at and just below the soil surface. Notice the new growth and the roots. Last year, this was a bine. If you look at the dried brown end on the left going to the top of the picture, imagine this as the growing shoot last year. The bine itself was in contact with the soil and it sent out roots over the winter and new growth this spring. Drop this in the soil and you've got everything you need for a new hop plant.

This should give you an idea of two things, the size of the crown and the size of the roots. Look how big around the root is next to the shovel. There were at least 6 roots of this size on this crown and they grew on average 5 feet long (Probably longer, but they would break off when I pulled them up). Some of them I had to cut with a saw.

After a good 45 minutes of digging I finally got this monster out of the earth. Here it is next to a 5 gallon bucket to compare.

Here is the bottom. It looks like there was no one main taproot and instead it sent roots out in all directions. The roots are easy to distinguish from the rhizomes.

Here's a closer view of the crown. Look at all of the shoots. I divided this thing up and replanted it. I would guess I trimmed about 75 percent of it off. I planted one large section of the crown and will use the rest to trade or give away.
Here are the rhizomes I harvested . I didn't bother to count but as you can see, there's a lot. Place one in the ground and 4 years later you can start the process all over again.
Here's a closer view of the rhizomes. Look at the new growth on each piece. These things are ready to be replanted.
For the time being, I planted them in this container. I will leave them here until I can find a new home for them. I'm going to take them to my next homebrew club meeting.
Here is the next plant, the East Kent Goldings. Another good one for ales. This one grew completely different from the Fuggles. I attribute that to the location. This one grew on the east side of my deck. It only got morning sun and hardly grew at all for the first 2 years. One other thing; the bines tended to grow under the deck and the come out the side. I found rhizomes 6 feet away from the main stem on this one. Also, I was able to pull most of it out with my hands. No hard digging required.

A short time spent trimming and here's another batch of rhizomes ready to plant. Each of these are around 12 inches long and as thick as your little finger. To compare, I started with something about 3 inches long and maybe as think as a pencil.

Here is the new home. The south side of my garage . They will get a full day of sun. Notice the twine and string I will use as a trellis. Hops need support. You'll see a picture below of how these 2 plants did last year. First year hops don't grow or produce as well as established plants. Second year plants do better but still are lacking when it come to hop cone production. When they get to their third year, they really take off.
Just a picture to show the twine string trellis. I have always let them grow up my deck and have never had to trellis them before. Oh well. Something new to learn about.
Here they are last year in September. Pay no attention to the steps on the ground. We had a small tornado blow through and my steps fell down. From the ground to the top rail of the deck is about 12 to 14 feet. I routinely trimmed the hops when they got to the top of the rail.

Below is the first plant I moved. The variety is Fuggles used for ales. I moved this here 3 years ago. I have done very little to it. Pour some fertilizer on the crown each spring and thats about it. It's grown very well and produced very well until a wind storm came along and stripped most of the cones off it.

This is the second plant I moved. East Kent Goldings. More about that below.

Here is a rhizome. These grow off to the side form the main crown. If you picture the main crown off to the right, you can see how the plant expands. These are right at and just below the soil surface. Notice the new growth and the roots. Last year, this was a bine. If you look at the dried brown end on the left going to the top of the picture, imagine this as the growing shoot last year. The bine itself was in contact with the soil and it sent out roots over the winter and new growth this spring. Drop this in the soil and you've got everything you need for a new hop plant.

This should give you an idea of two things, the size of the crown and the size of the roots. Look how big around the root is next to the shovel. There were at least 6 roots of this size on this crown and they grew on average 5 feet long (Probably longer, but they would break off when I pulled them up). Some of them I had to cut with a saw.

After a good 45 minutes of digging I finally got this monster out of the earth. Here it is next to a 5 gallon bucket to compare.

Here is the bottom. It looks like there was no one main taproot and instead it sent roots out in all directions. The roots are easy to distinguish from the rhizomes.

Here's a closer view of the crown. Look at all of the shoots. I divided this thing up and replanted it. I would guess I trimmed about 75 percent of it off. I planted one large section of the crown and will use the rest to trade or give away.

Here are the rhizomes I harvested . I didn't bother to count but as you can see, there's a lot. Place one in the ground and 4 years later you can start the process all over again.

Here's a closer view of the rhizomes. Look at the new growth on each piece. These things are ready to be replanted.

For the time being, I planted them in this container. I will leave them here until I can find a new home for them. I'm going to take them to my next homebrew club meeting.

Here is the next plant, the East Kent Goldings. Another good one for ales. This one grew completely different from the Fuggles. I attribute that to the location. This one grew on the east side of my deck. It only got morning sun and hardly grew at all for the first 2 years. One other thing; the bines tended to grow under the deck and the come out the side. I found rhizomes 6 feet away from the main stem on this one. Also, I was able to pull most of it out with my hands. No hard digging required.

A short time spent trimming and here's another batch of rhizomes ready to plant. Each of these are around 12 inches long and as thick as your little finger. To compare, I started with something about 3 inches long and maybe as think as a pencil.

Here is the new home. The south side of my garage . They will get a full day of sun. Notice the twine and string I will use as a trellis. Hops need support. You'll see a picture below of how these 2 plants did last year. First year hops don't grow or produce as well as established plants. Second year plants do better but still are lacking when it come to hop cone production. When they get to their third year, they really take off.

Just a picture to show the twine string trellis. I have always let them grow up my deck and have never had to trellis them before. Oh well. Something new to learn about.

Here they are last year in September. Pay no attention to the steps on the ground. We had a small tornado blow through and my steps fell down. From the ground to the top rail of the deck is about 12 to 14 feet. I routinely trimmed the hops when they got to the top of the rail.

Sunday, February 3, 2008
What's new?
I know - it's been forever since I posted anything. Chalk that up to many different things. In the end, I'll say it's time to get back to the important thing, and that's talking about starting seeds...
I've placed a few orders and will make my final choices when it comes to tomatoes this year. The only thing I know for certain is that I will grow fewer plants in 2008. I say that every year but this year I MEAN IT!
I'm also going to plant some other things. Squash, beans, cucumbers and potatoes. Maybe a watermelon. Also, I'll be planting a lot of flowers around the garage in the beds created by the retaining wall I built last year. Plus, I plan on moving my hops and trying to get them established next to the garage. I should be pretty busy this spring - I can't wait!
Subscribe to:
Posts (Atom)
